

If you’re like me, you like a good challenge. As a photographer, the most difficult subject is one without enough light on it! There are workarounds, though, so it IS possible to photograph dark rides at the Disney parks. This feature is all about how to get the best pictures on dark rides. To help us out, we’ve assembled tips and photos from some of the best theme park photographers out there. Hopefully, you’ll pick up some tricks on how to make your own photos even better!
Before going any further, let me remind you that these are dark rides, so TURN OFF YOUR FLASH. There’s nothing worse than sitting in a ride and being blinded by a bright light from another guest’s flash. It not only ruins the ride for others, but makes your photos look terrible.
Why are dark rides difficult to shoot?

Well, they’re dark, simple as that. Camera sensors can only be so sensitive to light! These attractions are carefully crafted by Imagineers to light only what they want you to see.
It also wouldn’t be so bad if you could set up a tripod with a long exposure, but these are rides with moving vehicles. Some move faster than others, some are more turbulent, but in any case, they make things difficult.
What equipment do I need to shoot dark rides?
Camera Body

Last week I posted about the contents of my camera bag. I use a Canon 70D, which is a mid-range DSLR. It has decent low-light performance, even at high ISOs, and has very sharp and quick focusing, even when lighting conditions aren’t superb.
If you’re looking for a nice camera, it will likely be a DSLR (popular ones are Canon and Nikon) or a mirrorless camera (Sony is leading in mirrorless). If you have anything comparable to my Canon 70D, you’ll probably do just fine shooting dark rides. Surprisingly, the Canon Rebel T6s and Nikon D5600 are pretty close but look for low-light performance and effective ISO when purchasing your next camera.
Point-and-shoots and phones are not good choices, even if you use manual settings. Their sensors are not sufficient to take low-light photos without a massive trade off in exposure, motion blur, and digital noise, among other things.
Lens
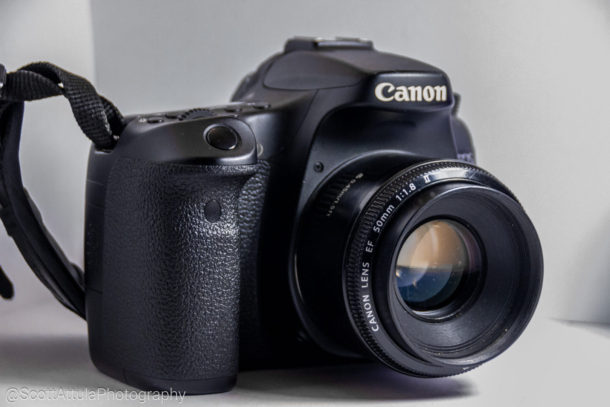
My main dark ride lens is the Canon 50mm f/1.8. The reason why you need a different lens than just the kit lens that came with your camera is that most kit lenses only stop the aperture down to f/3.5. I recommend the Canon 50mm one because it’s generally only about $100, the focus is tack sharp, and that f/1.8 aperture allows for extra exposure to light. The only issues are that it’s a prime lens so you can’t zoom and it doesn’t have a built-in image stabilizer so you need to have a steadier hand than usual.
I use the 11-16mm once in a while as the wide focal length can help with faster moving rides in masking the movement of the vehicle, but the exposure only stops to f/2.8 so the extra aperture is minimal.
Below, f/3.5 vs f/2.8
You can use whatever lens you want, f/2 or below is the range that works best. I’m personally looking at the Sigma 35mm F1.4 ART for the future, but be careful buying lenses that are made for full-frame sensors if you don’t own a full-frame camera (or visa-versa). Check your camera to see what kind of sensor it has before going too crazy with lenses (APS-C is cropped, Nikon calls it “DX” format). That 35mm lens I want will actually be the equivalent of a 56mm on my crop sensor.

Most Rebel-line DSLRs or comparable Nikons (like the D5500) aren’t going to focus as quickly as the 70D or 80D, and their low light performance will be less desirable. More expensive cameras (particularly full-frame ones) will work better in low-light, but they obviously cost more and are bigger and bulkier.
[clickToTweet tweet=”What gear do you use to photograph dark rides?” quote=”What gear do you use to photograph dark rides?” theme=”style3″]
What settings should I use?
Before you mess with any settings, you should probably make sure your camera is set to take RAW photos. The files are bigger and the camera can shoot less of them at a time compared to JPEGs, but I rarely see a dark ride photo that doesn’t need adjustment in post-production. RAW makes a huge difference in editing. You can even shoot RAW and JPEG at the same time if you feel like it.
Mode

I personally use Manual mode (“M” on the mode dial) for pretty much everything, so Manual is what I suggest. This mode gives you complete control over all the exposure settings. Full control is important, as it makes all your settings consistent while you’re shooting.
Photographers who are less comfortable with full Manual mode might find comfort in Shutter Priority (“Tv” on the mode dial). As per the name, this mode prioritizes shutter speed and that’s the only setting you get access to. The issue with shooting with shutter priority is that some camera models might decide to use less than ideal settings. Still, the main exposure setting you need to mess with on dark rides is the shutter, so in most cases, this mode will work fine.
Exposure Settings

Exposure settings are what tell the camera how much light to let into the picture; it’s basically everything having to do with taking a photo. I’m going to assume you’re shooting in Manual mode, but if you’re using shutter priority, then only pay attention to the shutter speed section below.
Aperture: This is a mechanical process in the lens that’s basically how big the hole is in the lens to let in light. Higher aperture is a smaller hole (for whatever reason), thus a lower aperture is desired for dark rides. My 50mm stops down to f/1.8, so I tend to set my aperture at f/1.8. Some people suggest f/2.0 to increase sharpness on prime lenses, but it’s up to you.
The caveat for a higher aperture is a denser depth of field. That’s not necessarily bad, as you can use that to create creative photos, but at f/1.8 the focus is tack sharp; one very small part of the entire photo is going to be in focus. Choose your focus point wisely!
Shutter speed: Another mechanical process, but in the camera itself (it’s what makes that recognizable “click-click-click” sound). The shutter is similar to a shutter on a window, it lets in light, but the “speed” of the shutter is how long that shutter remains open. In low-light, you need a slower shutter speed (so the shutter will stay open longer), and I usually shoot within a 1/100-1/30 range.
At 1/30, the sensor is exposed to light for 1/30 of a second. I’ve used shutter speeds that are even slower, but generally, there has to be a ride stop and a way to steady the camera; attractions tend to move too quickly to use slower shutter speeds while they’re in operation.1/60-1/80 seems to be a sweet spot for most people.

The caveat for a slower shutter speed is motion blur. Since you and your subject are moving, you have a higher likelihood of introducing motion blur from either your hand or ride vehicle moving the camera. If the subject is moving rapidly, you might get blur from the subject itself. In most cases, you’re just going to have a hard time keeping the camera still, so choose a comfortable shutter speed.
ISO: This setting is digital, in that it increases the sensitivity to light in the sensor. In low-light, you have no choice but to bump the ISO. Personally, I leave the camera on auto-ISO so I don’t have to deal with it. Most of the time, ISO 1600 or above is what you’re going to have to deal with, depending on your gear. ISO 3200 seems to be a sweet spot for most people. My camera has an option to choose what range of ISOs you want to use for auto-ISO, so that’s something you can use if your camera tends to use too high of an ISO.
The caveat for a higher ISO is higher digital noise, the grainy stuff that makes your pictures look like they were printed on old sandpaper. The only thing you can do to eliminate the noise is to shoot a lower ISO. It’s hard to deal with noise, especially if you’re like me and tend to “expose to the right” and use more exposure than technically needed. Some noise can be masked with the right settings in post-processing, but if you want sharp photos you don’t want to use noise reduction; just plan to shoot at a lower ISO.
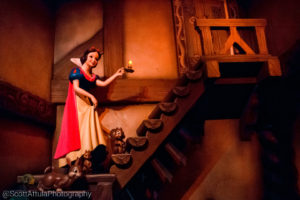
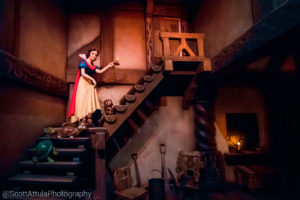
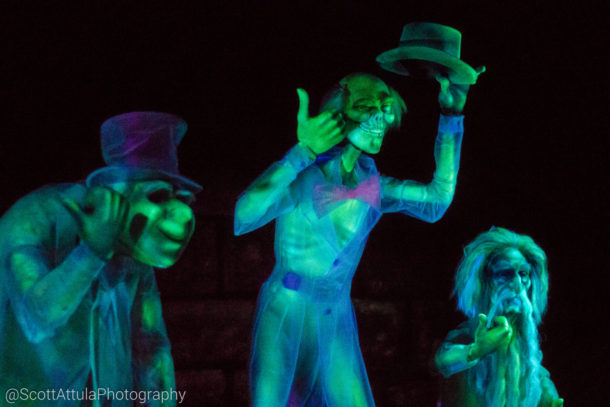
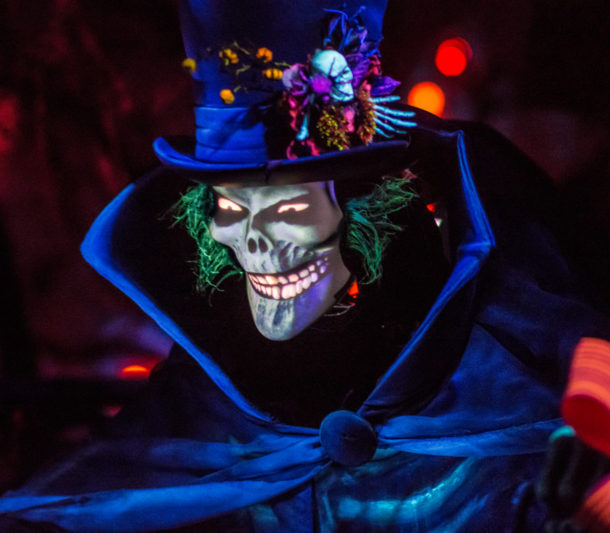
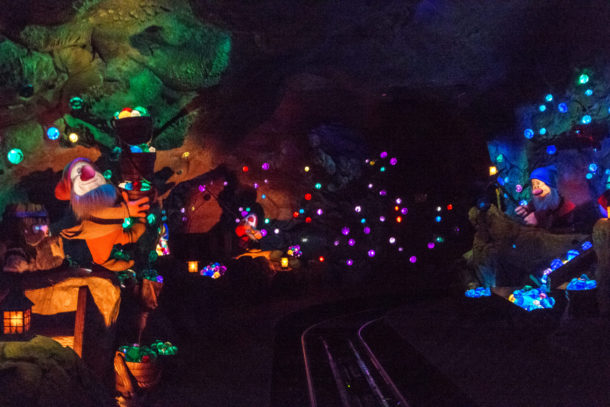
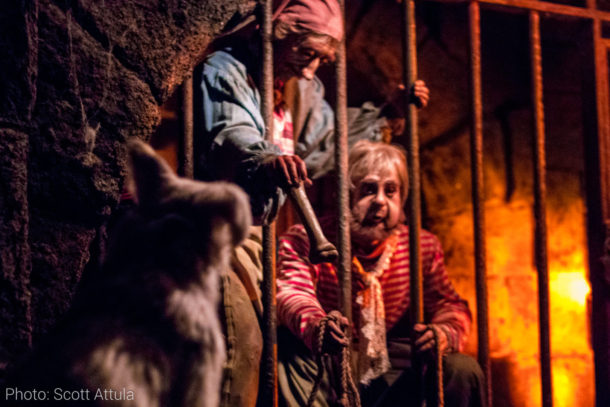
Something else to note: Many newer attractions like the Seven Dwarfs Mine Train, Frozen Ever After, and Radiator Springs Racers (plus anything that’s been “plussed” with figures like the Hatbox Ghost on Haunted Mansion) have characters that use animated eyes and faces. The effects are actually screens and look really bright and wonderful, but they can wreak havoc on camera sensors. Part of it is shutter speed (which creates a sort of rolling shutter effect), part of it is being very bright compared to the rest of the scene. In most cases, you’re going to have to fix them in post and will have no other real options (and it may not be fixable in Lightroom only), but it’s something to be aware of.
Editing Dark Ride Photos
Unless you’re planning to get really nitty-gritty with editing in Photoshop, some basic settings in Lightroom or Camera RAW will work in most cases. These suggestions should get you started:
White Balance

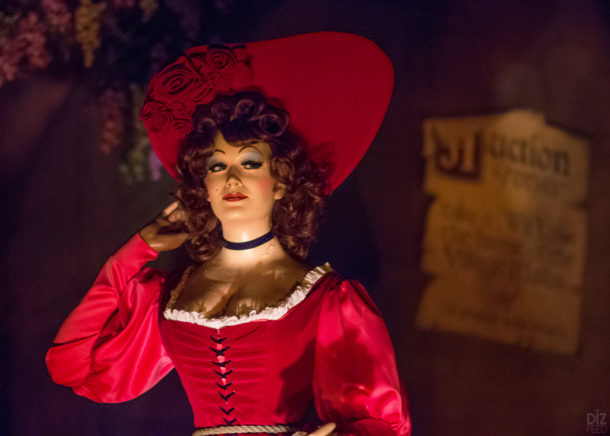
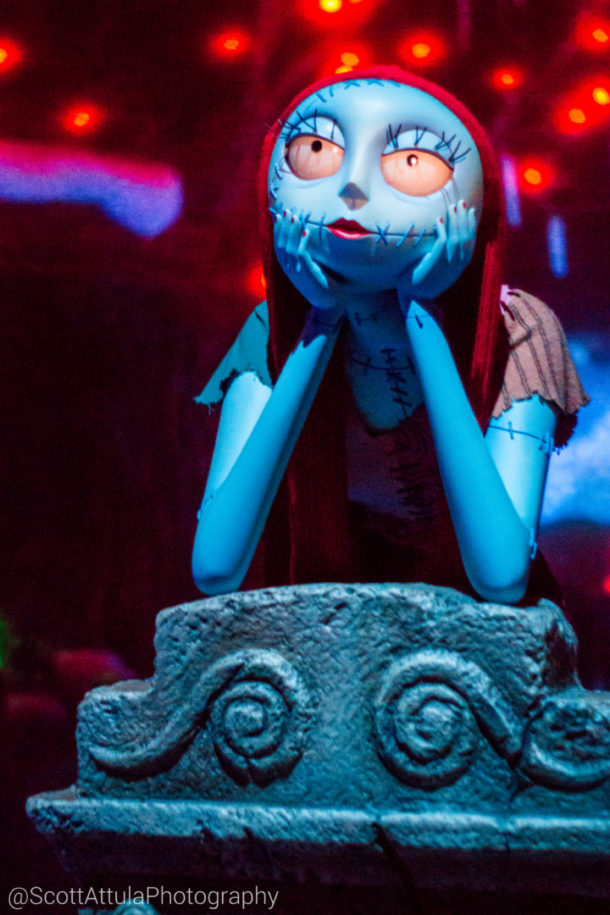
When it comes to dark rides, this is a hard setting to work with, but it’s generally the make-or-break setting. Many of the lights that Disney uses in their attractions have dramatic color temperatures. Fire and lanterns are warm colored and most of the themed areas we visit use lanterns or fire for light. Every attraction is different though, as photos from the Haunted Mansion might be cooler in color, Pirates of the Caribbean might be very warm, and Fantasyland dark rides might have a lot of green tint from the blacklights.
I usually start off with selecting “auto” and seeing what it gives me. It generally gives me either too cool or warm, but it can be a starting point. The colors on dark rides are dramatic so I don’t suggest using the color picker to find what you think should be “white.” You’re really going to want to work with Temperature, as it controls the warm or coolness of the colors. When it comes to Tint, that’s up to the image if it needs more green or magenta. In the case of my Winnie-The-Pooh photo, it seriously needed both adjusted.

For any photo, it’s more of a personal taste of what you want your colors to look like. You can either choose to make the photo more attraction realistic or color realistic. For example, you might want to leave your Pirates photos warmer than you might other photos because the attraction to the naked eye is actually pretty warm anyway. I try to pick a good middle ground usually, but again, that middle ground is subjective to each person.
Tone
Tone is the panel where you’re going to fine tune your exposure. I tend to “expose to the right,” so my settings reflect that. Here are some suggestions for these settings:
Exposure: This adds more general exposure to the image. You can up this a bit if it will help, but beware of increasing the intensity of your digital noise. I have a couple tricks for using this without increasing that intensity, both in Tone and HSL (and sometimes you can actually get the slider to go negative and seriously decrease the intensity of the noise).
Contrast: This raises the highlights and darkens the shadows. I tend to bump this up a little bit to hide some of the noise in the shadows. It also helps make things a little more dramatic as well, so that’s a bonus.
Highlights: Raise or lower the brighter parts of the image. In general, your highlights are going to be overexposed and will need to be brought down. Adjust to your liking.
Shadows: Raise or lower the darker parts of the image. In general, you can raise this slightly, but not too much. I use a combination of raising this, contrast, and blacks to get some nicer shadows.
Whites: Adjusts the whites in the image. Adjust to your preference as this affects highlights usually.
Black: Adjusts the blacks in the image. I always bring the blacks down a bit to hide some of the darker parts of the image and create a more dramatic look.
Presence
Clarity: This setting plays with the contrast of the mid-tones of the image. I recommend being very careful with this setting as it creates strange artifacts and halos around objects in many cases. Only increase this by 10-20 if you feel like your image even needs it.
Vibrance and Saturation: How vibrant and saturated your colors are. I combined them because you don’t need much of either, especially with how saturated dark ride scenes are anyways. I usually set both to +10 and come back before the final export to play with them. Usually, I don’t even change afterward.
Hue, Saturation, Luminance (HSL)

This is how to fine tune colors without dropping the image into Photoshop. This panel uses eight channels of color that can be fine-tuned in their hue, saturation, and luminance. Here’s what to do with them:
Hue: Without explaining the basics of the color spectrum, this just changes the shade of each color channel. Not every image is going to have all of the colors of the spectrum, so just worry about the colors that are there.
My camera tends to saturate warmer colors on most dark rides towards the yellow-ish side, so I tend to make them a little bit more of a darker orange. Play with the sliders of the colors until you get the shade of colors you want.
Saturation: Color saturation for each channel. Say the predominant colors are warm so I would pull back on the warmer colors as they’re likely the ones that are oversaturated. I then would usually have a lot of blues in my shadows so I pull a lot of the cooler saturation out to help balance the colors.
Luminance: This changes the intensity of the exposure of each color. I generally use this in two ways (let’s assume the predominant colors are warm again). First, pull back the intensity of the blue in the shadows, and then second, brighten up some of my warmer colors. In brightening up the warmer colors, I can often pull my exposure slider from the tone panel down, which helps make the scene more dramatic looking and can eliminate the intensity of the noise and grain.
Lens Corrections
Correcting the distortion from the lens is something you should probably do every time you edit an image. This helps “flatten” the image so that everything looks the way we see it. A lens can distort portions of the captured image into a concave or convex shape. A lot of lenses create a natural vignette around the edge of the image as well. Most people don’t see it, but it makes a difference.
If you’re shooting in RAW, it’s as simple as clicking on “remove chromatic aberrations” and “enable profile corrections.” Lightroom should find the correct profile to fix the lens distortion and vignette. Luckily there’s very little distortion and vignetting on my 50mm lens since it’s a prime lens and has a long focal length so there’s not much adjustment to be done.
Something to note, though: Be careful with the vignette correction on dark rides. A lot of the time the correction will end up just correcting dark shadows and it will have no benefit. Just go ahead and slide the “Vignetting” slider down to “0” if you don’t want the dark corners brightened up.
It’s a lot of work and extra planning to shoot dark rides at Disney Parks, but how do yours look? Sharp and dramatic, hopefully. I hope these tips help you get started with shooting beautiful photos of your favorite attractions! Let me know in the comments what your dark ride shooting and editing workflows are! Also, in the future, I’ll plan on covering specific experiences (specific attractions, shows, etc) so let me know in the comments what you want me to cover!
If you enjoyed the photos in this article, make sure to follow @Dizfeed, @Disneylandpanda, @Disneyland_over_everything, and me (@ScottAttulaPhotography) on Instagram! Thanks to my friends who contributed their dark ride photos, you guys are amazing!
You must be logged in to post a comment.